Getting to know COA Drones and Flight Procedures: First in Flight
The two Phantom 4 are named da-dji4-01 and 02 (Pro v2 is DA-dji4pro-01)
The Mavic Pro 2 is named: da-mav2-pro-01
They all have FAA registration numbers listed on the front part of the copter. (do not tamper with these numbers)
DJI Mavic Pro 2 : is this the drone for you?
Good review of Mavic Pro Zoom:
https://www.youtube.com/watch?v=v2J-SrmM9N4
DJI Mavic Pro 2 (Fly More KIt: Amazon)
DJI Phantom 4: (Amazon) (The Newer Phantom 4 Advanced: Amazon)
DJI Phantom 4 Pro V2: (This is the Phantom 4 Pro V2.0: Amazon)
Tony and Chelsea Northrup: This gives a nice detailed review of what the Phantom 4 Pro is capable by a Photo Professional.
The software to operate the DJI Drones is DJI Go 4. Use this overview in their description with links to different parts of the video to jump to sections you may have question about. The video covers the Phantom 4 and Phantom 4 Pro, but of course the software architecture is the same for both the Mavic and the Phantom.
DJI Drones are to a degree , maintenance free. There are some Battery Observations and practices, screws, plastic pieces, landing gear removal, Prop inspections and upgrades, Remote Control Stick and Antenna upgrades, But for the most part, they are tough little drones, That said, when you do have a gimbal break, or landing gear snap. its best to be serviced by a reputable source for DJI repair.
DJI Maintenance Check List/Manual:
Firmware Updates
Phantom 4 pro v2 assistant 2: Use the downloaded flight assistant for whatever dji device you have on your PC/Mac . Makes updates pretty simple.
When you first boot up your dji software, if you have internet connection. It will test the firmware/NFZ Database update and see if you are out of date.

DJI Operational Status Lights and Warning Light meanings:
Phantom 4:

Mavic Pro:
Here are some excellent check list items before you fly provided by DJI. Get to know them and they will become second nature.

If you recall The FAA has Safety procedures and Maintenance, and good practices in the name of Aeronautical Decision Making (ADM) Its a long read.
Make sure you register your drone before your first flight:
FAA Drone Zone, Create an Account, Register the Model and Serial number: 5.00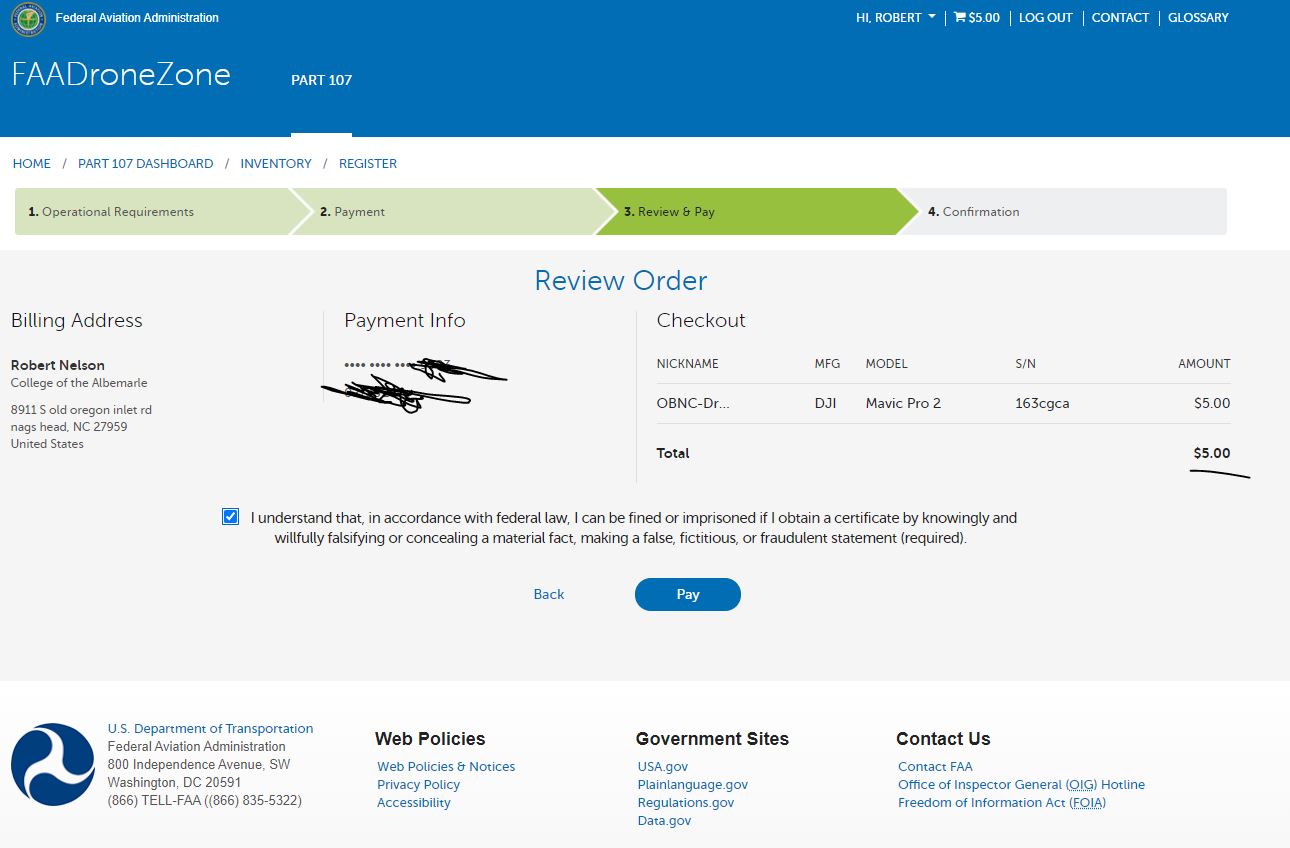
Here are the basics of Flight Safety Practices: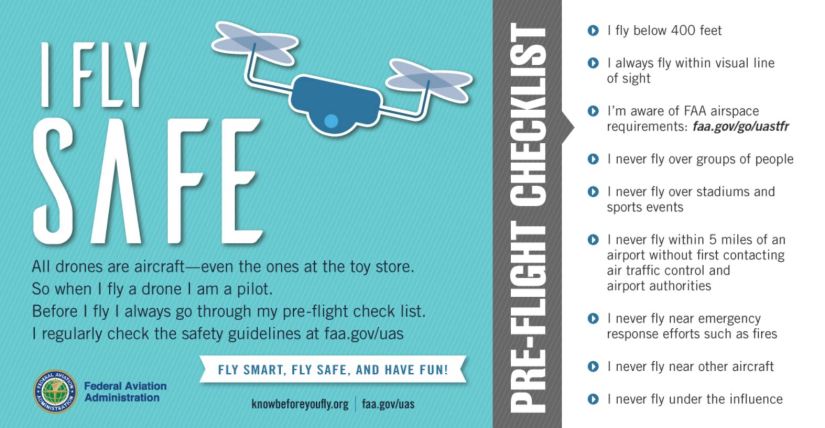
The FAA recommends keeping a Flight Log. If you recall, they made it very clear, in the event of an emergency or a accident; The FAA will call on any documentation you have on records , flight log or maintenance schedules/logs.
Now there are a number of ways to handle this: here are some electronic options using certain apps:
Most have a basic free version and the availability to add plans with extra features for a price. (These are courtesy of jrupprechtlaw.com)
- http://www.hoverapp.io/
- https://kittyhawk.io/
- https://www.dronelogbook.com/homePage/index.php
- https://skyward.io/
- https://www.dronecomplier.com/
- https://airdata.com/
Traditional , a good paper copy of a spreadsheet, or chart can also be used. (Even a Legal Pad)
Download this PDF for the list we will use in class:
This App lets you keep a digital checklist.
Here is a PDF example of a log book for flight and maintenance.
So just take some basic info:
Location
Type of Flight
Notams you may have found for that area. Temp or permanent.
Notes: Battery use, issues, observations.
K.I.S.S.
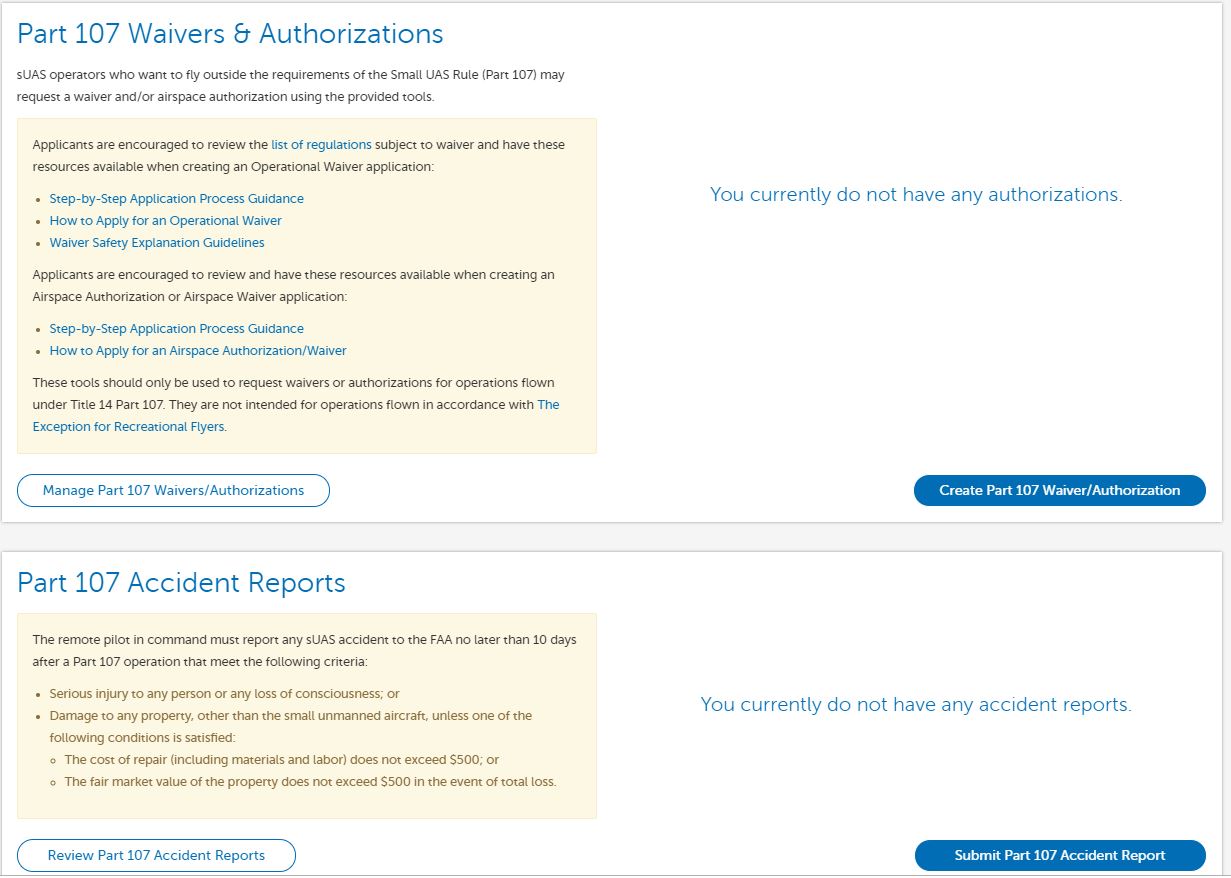
If there is an accident causing and serious damage to property or people up to ten days. , log into your FAA Drone Zone, Can file a report there:
The DJI Go 4 app on each device its installed on, keeps detailed records of each flight when they happen. These serve well for records if you only fly with one device and drone. Otherwise it will list the different dji devices you use for that device. The drone itself will keep a record of the data as a cache as well.
Exporting flight Data: link will export as a .dat file then use a log viewer utility to decrypt that data into usable points.

Once you have determined that it is safe on the ground and your flight procedures are in order. It’s time to fly!
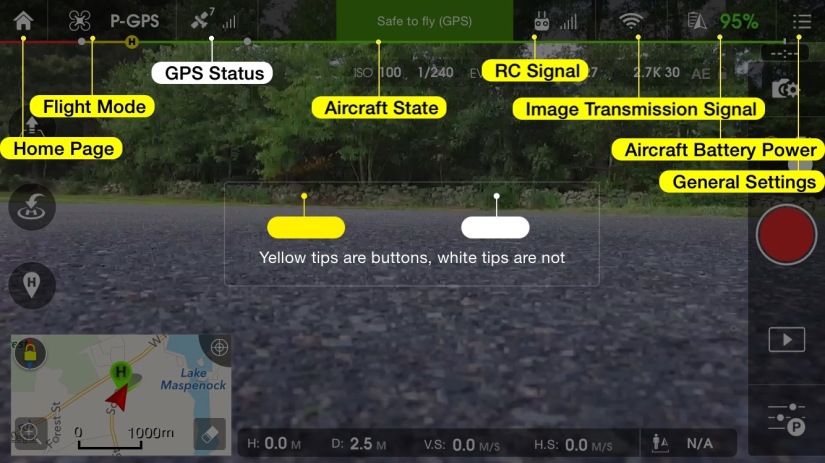
Getting to know the DJI Go 4 Software app that runs on your IOS or Android device.
The Entire Menu: listed in description and jpegs:
Lets go over every single menu, setting and button to help you better understand this incredibly powerful yet complex app. Whether you have a DJI Mavic Pro, DJI Phantom, or a DJI Inspire, this will help you understand the software behind this miracle of flight!
Use this Link in Class to walk through the Software in class:

The ultimate Walkthrough DJI Go 4 software : Link Here For Class!
![]()
Use this link below to open the Menu Guide in PDF.
Use this Link to open a PDF of control settings and features of the DJI Go 4 App


Explaining Frequencies:
https://www.youtube.com/watch?v=wdhkNbIx6c8
Some information on Photo/Camera Settings: Link Here
Tony does a great job again in the video that I listed above earlier to cover all you need to know about the many layers of this app:
https://www.youtube.com/watch?v=q3YXfsV1vIc
jump to 16:52


Billy Kyle is a good follow :
DJI Mavic Pro 2 + Zoom modes:

This is a great visual example of the three modes on the phantom:
https://www.youtube.com/watch?v=6jjuxUz_k94
Simulated Flight Mode:
We will do a few exercises with this simulator: Just teaching basic Controller functions :
Auto Take off
Mastering Directions
Return Home
Here is a link explaining each feature:
How to Fly a Drone: Beginner Guide to Quadcopter Flight
Learning The Nuances of Quad copter flight:
Everyone will have different struggles learning the controls of the four motors/props on a quadcopter drone. From take off, to altitude adjustments, to forward and backward “pitch”, to side right, to side left “yawl”. Finding the orientation of each stick and using the natural flow of right stick and left working together can take some practice.
Keep this in mind: Drones fly thanks to a very complicated process involving electronic sensors, micro computers, gyroscopes, accelerometers, and radio waves. However, they are designed to be simple to operate and user friendly. Keep in mind, though, that a drone is a complicated system that requires knowledge and care to operate safely.
Simply, a drone takes off when the spinning propellers produce downward thrust that is more than the weight of the drone itself. More motor power means more thrust from a faster spinning propeller, and the faster the drone will climb. For a GPS or position sensor-equipped drone, the left stick typically stays in the center. Pulling it back decreases power and makes the drone descend. Pushing it forward increases power and will cause the drone to climb. Releasing the stick to the center will allow the drone to maintain the altitude it is at. The flight controller and sensors are doing the work of keeping the drone at the altitude you specified.
Lets get down to basics to learn:
- Take Off and Landing
- Altitude adjustments
- Rotation Clockwise/Counter Clockwise
- Forward Pitch
- Backward Pitch
- Right Yawl
- Left Yawl
Pre Flight Preparation:
Before you turn on your drone, its a good idea to gather a little information for your logbooks: Digital and/or Paper…
Make a quick notation of what kind of flight you are doing today. (is it for pleasure, or actually a job, what kind of job)
Take note, what kind of drone, and what battery you are flying with. A, B, C, etc… (if you have more then one battery, label them accordingly)
Take note of the Weather, and location using a flight readiness app such as Kitty Hawk or Airmap to check location, weather, and flight restrictions, NOTAM’s. Use this on a cellular device if you can.
Once you have verified you have good weather conditions, visibility, and you are not in any airport fly zones. It’s time to access your surroundings.
Are you good locally within your town ordinances?
Are you are on private property and is your flight going to fly over other peoples property, roads, or any events/people etc?
Are you aware and prepared to follow FAA guidelines? Simple rule of thumb:
After all this red tape, you are ready to start up your drone’s Software, Hardware, and get flying.
Beginner Flight One:
Its good practice, whatever device you are using , to start fresh every time. After connecting your mobile device of choice with the RC controller with the mini usb cable. Make sure the app is shut down. For apple double click home button, and slide app off towards any direction to close.
Start the RC Controller, Start the Drone/Quadcopter: usually a double tap on power button, holding the button until you hear a ba-lipoopla)
Then start your DJI Go 4 app on connected mobile device: after a series of seconds they should all sync and you can then enter the control screen:

Your screen will give you details about your device. updates to firmware, and no flyzones. If your device comes up with an update and there is a online connection to download. You may have the option of skipping the update for a later time when you are not going to fly.
For this beginner lesson: we will get right into simple flight procedures:
Take off and Landing:
Place the done in front of you, preferably on a hard surface or landing pad. Grass, sand, dusty conditions will create a bit of a mess once the props fire up. You’ll try and use this same location as a landing area, so pick wisely and look around area for obstructions.
If you have people in your group, (more than one) make sure your group is aware of who the remote PIC (pilot in command) is and make sure someone is assigned to be the VO (Visual Observer)
If at all possible, the PIC (pilot in command) would benefit greatly if they could be in shade, both from heat, and to help screen visibility issues , glare etc.. If this shade restricts the pilot and or the VO (Visual Observer) adjust accordingly .
Now its time to launch the Drone!
after all is clear, checked, and your flight intentions are broadcast to the group: Clear Prop! It’s time to hit the take off button.

After Flight sequence, and button are initiated , the drone will launch and hover at a 4 foot location over take off zone.
The motors will adjust to GpS, Wind, and user controls as yoou prepare to engage with the drone.
Forward and Back, Left and Right

Practice 1
Once you have taken off and the drone is in a stable hover, make sure your practice area is clear. We are first going to practice forward and backwards movement. During this exercise the drone will always face away from you.
According to orientation of where you placed the drone. rotate the left stick (clockwise/counterclockwise) so drone is facing away from you.
Push the right stick forward to make the drone move forward. The farther the stick moves, the faster the drone will fly. If your drone is GPS equipped, releasing the stick should stop the forward movement and maintain a stable hover. If your drone is attitude mode only you will have to pull back slightly to stop your forward movement and return to a hover. Now pull the right stick to the rear to have the drone return to you. Practice this a few times to get a feel for how your drone flies.
Return to your landing spot and now push the right stick to the left and right. The drone will fly side to side. Practice this as well a few times to get the hang of it.

Now that you are comfortable with forwards and backwards, left and right, let’s put it together to fly a square. Start from your landing spot and in a stable hover, push the right stick to the left and fly a few feet. Release the stick to return to a hover. Push the right stick forward to fly forward a few feet, releasing the stick again when you are ready. Push the right stick to the right before releasing it. Try to be in line with your takeoff/landing spot when you stop. Lastly, pull the right stick to the rear and have the drone back up and return to the takeoff/landing spot. Practice this by starting the square both to the left and right, and try to minimize the time you stop at each corner.

Congrats! You have completed your first Drone Flight Milestone! Lets move onto the next challenge:
Staying Oriented
As we discussed, many pilots crash because of a loss of orientation when learning how to fly a drone. It can take a significant amount of practice before you are comfortable when flying your drone, and it is not facing away from you. It can be difficult to distinguish the front and back of your drone as most are mostly symmetrical all the way around. A good way for new pilots is to mark the front arms with some colored tape, or purchase prop guards with a different color for the front of the drone. This will make it much easier to tell which end is forward.
For this exercise we are going to go back to the forwards and backwards, left and right. The difference is that we are going to point the front of the aircraft in different directions while performing the exercise.

Start as before over your takeoff/landing point in a stable hover. Push the left stick to the left. The drone will spin in place to the left. This is the yaw control. Now that the drone is facing to the left, perform the same practice maneuvers as before. The difference is that now the right stick, instead of pushing forward or backwards to make the drone fly towards or away from you, the right stick will be moved left and right to perform the same function. You are now using the roll control to move forward and away from you. Moving left and right of your position will now be done by moving the right stick, or pitch control, forwards and backwards. Practice this movement for a while before returning your drone over the takeoff/landing point. Use the left stick again to turn the nose of the drone to the right. Repeat the same exercise until you are comfortable with the movement.
Return your drone to the takeoff/landing location and use the left stick to point the nose of the drone directly at you. This is known as “nose-in” hovering. The functions of the right stick have somewhat returned to normal where pushing forwards and backwards will make the drone fly toward or away from you, and pushing left and right will make the drone move left and right, however, the controls are now reversed! As before, take your time and practice the same forwards and backwards, left and right exercise to become comfortable with this change of orientation. Once you are ready, use the left stick to turn the drone away from you again and return to the takeoff/landing spot in a stable hover. Now we are going to put these motions together in a square pattern.
From the takeoff/landing spot, use the left stick to turn the nose of the drone to the left. Now push forward on the right stick to cause the drone to fly forward a few feet before stopping. Now use the left stick to turn the nose of the drone away from you. Push the right stick forward to fly away from you a few feet. Left stick again to turn to the right before pushing the right stick forward to fly until you are back in line with your takeoff/landing spot. Use the left stick to turn the nose of the drone directly towards the takeoff/landing spot. Push forward on the right stick to fly to the takeoff/landing spot and return to a stable hover once you reach it.
As with the first square exercise, practice this starting off both to the left and right. Try and keep the square side as equal as you can. If at any time you lose orientation, use the left stick to turn the drone until it faces away from you and return it to your desired position. Learning orientation and muscle memory is a skill that takes dedicated practice to master. Take your time during this stage as it is the most important skill that you will need to safely fly your drone.
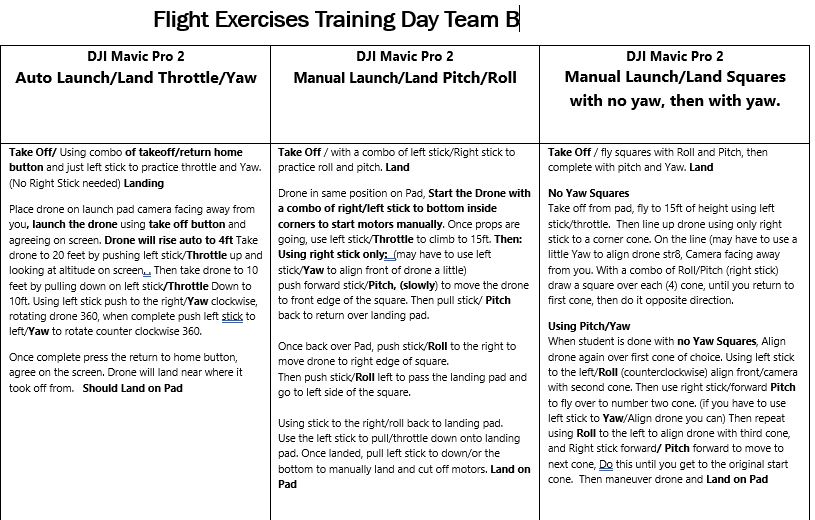
Practice Two:
These Graphics below show the Square, the circles and the figure 8, but with the appropriate control movement.
The Basic Square , with no Yaw:

The Basic Square with Yaw:

Next Week we will continue to work on flying exercises. If we have time today, we will start:
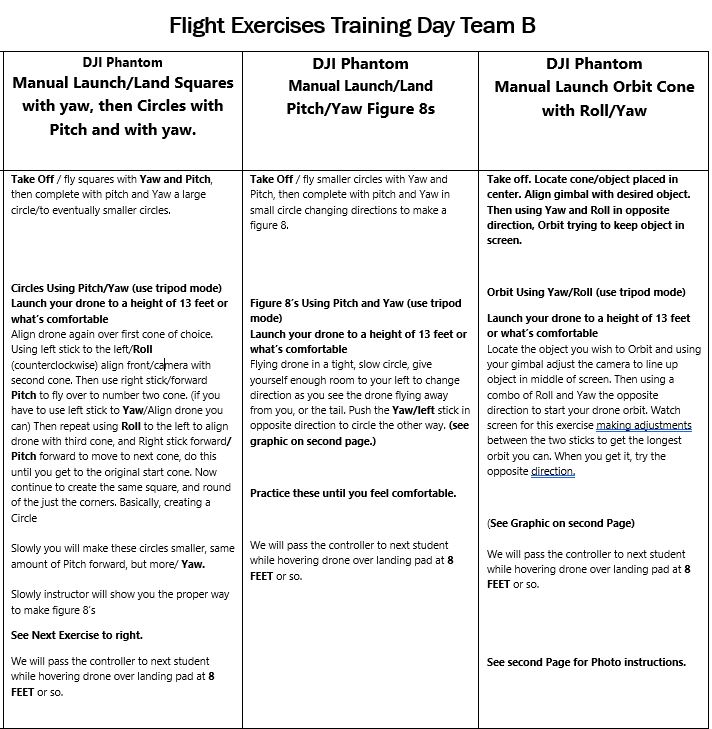
The Circle:

If time allows, we will move onto the next exercise that’s usually reserved for second day of flying .
The Figure 8:

Flying the Drone in a Orbit around a subject.

So We will introduce the Orbiting around an object using a cone as the subject.
As we wrap up our exercises, students will Be shown the nuances of the Camera Features and how to use the Pano features and take a few Photographs:
Thank you!
Enjoy your flights!
