How to Fly a Drone: Beginner Guide to Quadcopter Flight and Photo Capture

We will learn the nuances of quad copter flight doings some basic flight skills
Tonight’s class will be a combination of basic flight skills with using the skills we practiced Tues, to a couple more advanced techniques. Then we will move on to some Photography Lessons.
There will be instructions and a briefing in the Fly stations this evening.
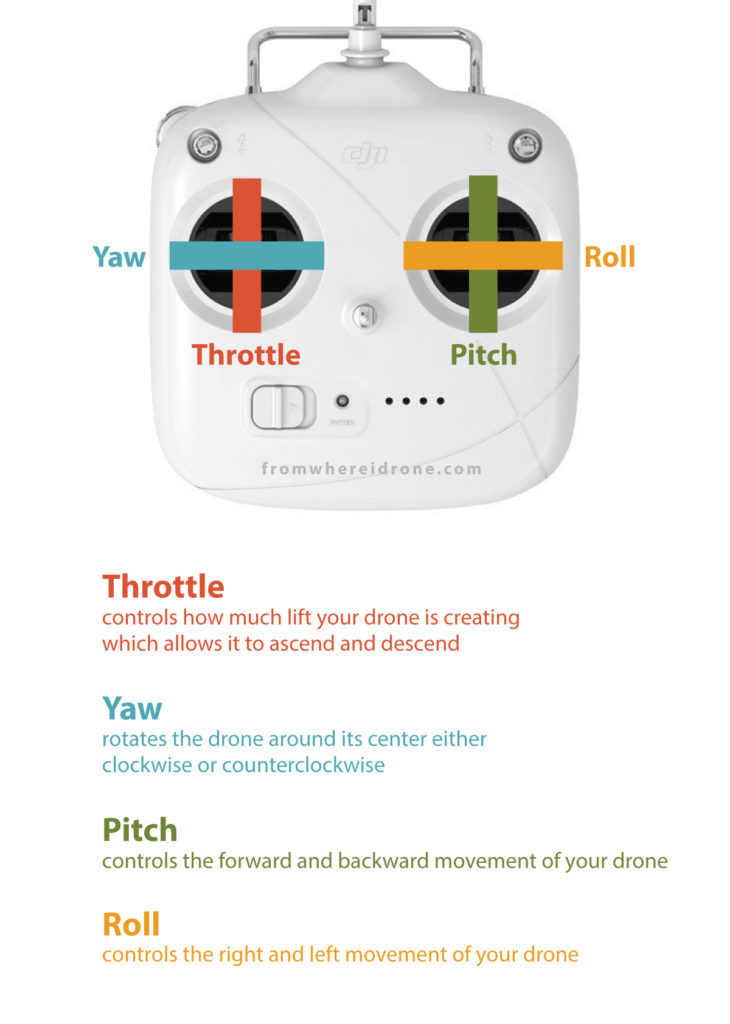
Everyone will experience different struggles learning the controls of the four motors/props on a quad copter drone. From take off, to altitude adjustments, to forward and backward “pitch”, to rotation clockwise/counter clockwise “yawl” , to side right, to side left “roll”. Finding the orientation of each stick and using the natural flow of right stick and left working together can and will take some practice.
Keep this in mind: Drones fly thanks to a very complicated process involving electronic sensors, micro computers, gyroscopes, accelerometers, and radio waves. However, they are designed to be simple to operate and user friendly. Keep in mind as well, that a drone is a complicated system that requires knowledge and care to operate safely.
Simply, a drone takes off when the spinning propellers produce downward thrust that is more than the weight of the drone itself. More motor power means more thrust from a faster spinning propeller, and the faster the drone will climb. For a GPS or position sensor-equipped drone, the left stick typically stays in the center. Pulling it back decreases power and makes the drone descend. Pushing it forward increases power and will cause the drone to climb. Releasing the stick to the center will allow the drone to maintain the altitude it is at. The flight controller and gps sensors are doing the work of keeping the drone at the altitude you specified.
Lets get down to basics to learn:
- Take Off and Landing
- Altitude adjustments
- Rotation Clockwise/Counter Clockwise
- Forward Pitch
- Backward Pitch
- Right Yawl
- Left Yawl
Pre Flight Preparation:
Before you turn on your drone, its a good idea to gather a little information for your logbooks: Digital and/or Paper…
Make a quick notation of what kind of flight you are doing today. (is it for pleasure, or actually a job, what kind of job)
Take note, what kind of drone, and what battery you are flying with. A, B, C, etc… (if you have more then one battery, label them accordingly)
Take note of the Weather, and location using a flight readiness app such as to check location, weather, and flight restrictions and create a flight Mission. Use this on a cellular device if you can.
Airmap is also a flight ready application, that has a nice web interface to see warning areas and areas of interest , weather, advisories etc…
Once you have verified you have good weather conditions, visibility, and you are not in any airport fly zones. It’s time to access your surroundings.
Are you good locally within your town ordinances?
Are you are on private property and is your flight going to fly over other peoples property, roads, or any events/people etc?
Are you aware and prepared to follow FAA guidelines? Simple rule of thumb:

After all this red tape, you are ready to start up your drone’s Software, Hardware, and get flying.
Beginner Flight One:
Its good practice, whatever device you are using , to start fresh every time. After connecting your mobile device of choice with the RC controller with the mini usb cable. Make sure the app is shut down. For apple ios double click home button, and slide app off towards any direction to close.
Start the RC Controller, Start the Drone/Quadcopter: usually a double tap on power button, holding the button until you hear a ba-lipoopla)
Then start your DJI Go 4 app on connected mobile device: after a series of seconds they should all sync and you can then enter the control screen:

Your screen will give you details about your device. updates to firmware, and no flyzones. If your device comes up with an update and there is a online connection to download. You may have the option of skipping the update for a later time when you are not going to fly.

For this beginner lesson: we will get right into simple flight procedures:
Take off and Landing:
Place the done in front of you, preferably on a hard surface or landing pad. Grass, sand, dusty conditions will create a bit of a mess once the props fire up. You’ll try and use this same location as a landing area, so pick wisely and look around area for obstructions.
If you have people in your group, (more than one) make sure your group is aware of who the remote PIC (pilot in command) is and make sure someone is assigned to be the VO (Visual Observer)
If at all possible, the PIC (pilot in command) would benefit greatly if they could be in shade, both from heat, and to help screen visibility issues , glare etc.. If this shade restricts the pilot and or the VO (Visual Observer) adjust accordingly .
Now its time to launch the Drone!
after all is clear, checked, and your flight intentions are broadcast to the group: Clear Prop! It’s time to hit the take off button.
Flight Control Training
We will work on flight techniques . The most common problem with a new Drone pilot is figuring out the aircraft’s orientation in the sky. Using Visual observation techniques and the flight screen on your remotes device, you can get a good idea of where the aircraft is pointing and how to navigate the Drone where it is you want to fly it.
The eventual goal is to have the stick movements become second nature and getting more comfortable flying with the screen with First Person View using the flight screen on your remote’s device.
After our initial flight introduction we will move onto capturing some stills with the on board camera.
There will be a series of photos each student will be tasked to take tonight. Each group will be assigned a building . Around the building on all four points on the compass, you will take a picture. Including an overhead shot. Examples below.
Lets start with some simple control explanations:
Last Thursday you used a combination of Throttle, Yaw, Pitch, and Roll to fly the Drone in a square, today we will complete a circle, and eventually in figure 8’s.
Here are is some great info to help dampen the controls a little, to make them less sensitive:
These Graphics below show the Square, the circles and the figure 8, but with the appropriate control movement.
The Basic Square , with no Yaw:

The Basic Square with Yaw:

The Circle:

The Figure 8:

Flying the Drone in a Orbit around a subject.

So We will introduce the Orbiting around an object using a cone as the subject.
If time allows, We will start shooting the buildings. Shot list below.
Next Tues/Class we will work on documenting the buildings on campus. First with photos, and then moving on to video capturing. Team A: Cora, Audrey, Ken Will help capture Building A. And shoot a Shallowbag Bay Pano.


The pictures will be handed out during flight to prepare you for where you need to place your drone to capture the shot. Team B: Ed, Tom, Treyvon Will help capture Building B, both Buildings, and a pano of Shallowbag Bay.


Have a great Flight!
